Medical Device Security Testing Guide: What to Test, When to Test It, and What FDA Expects
Medical device security testing is more than one penetration test. Here is a practical, FDA-aligned guide to the reviews, tests, and evidence device teams should plan.
Medical device security testing is not one event at the end of development. It is a sequence of reviews, automated checks, and adversarial exercises that should start early and get sharper as the device matures.
This medical device security testing guide is anchored on three things: the security testing approach in our CyberMed book, FDA's cybersecurity premarket guidance, and ANSI/AAMI SW96's risk-based approach to device security. They all point to the same conclusion: if you wait until the end for one penetration test, you are already behind.
The right question is not "Do we need testing?" The right question is "Which reviews and tests belong at each stage, and what evidence do we need when FDA asks how we know our controls work?"
What FDA and SW96 are actually asking for
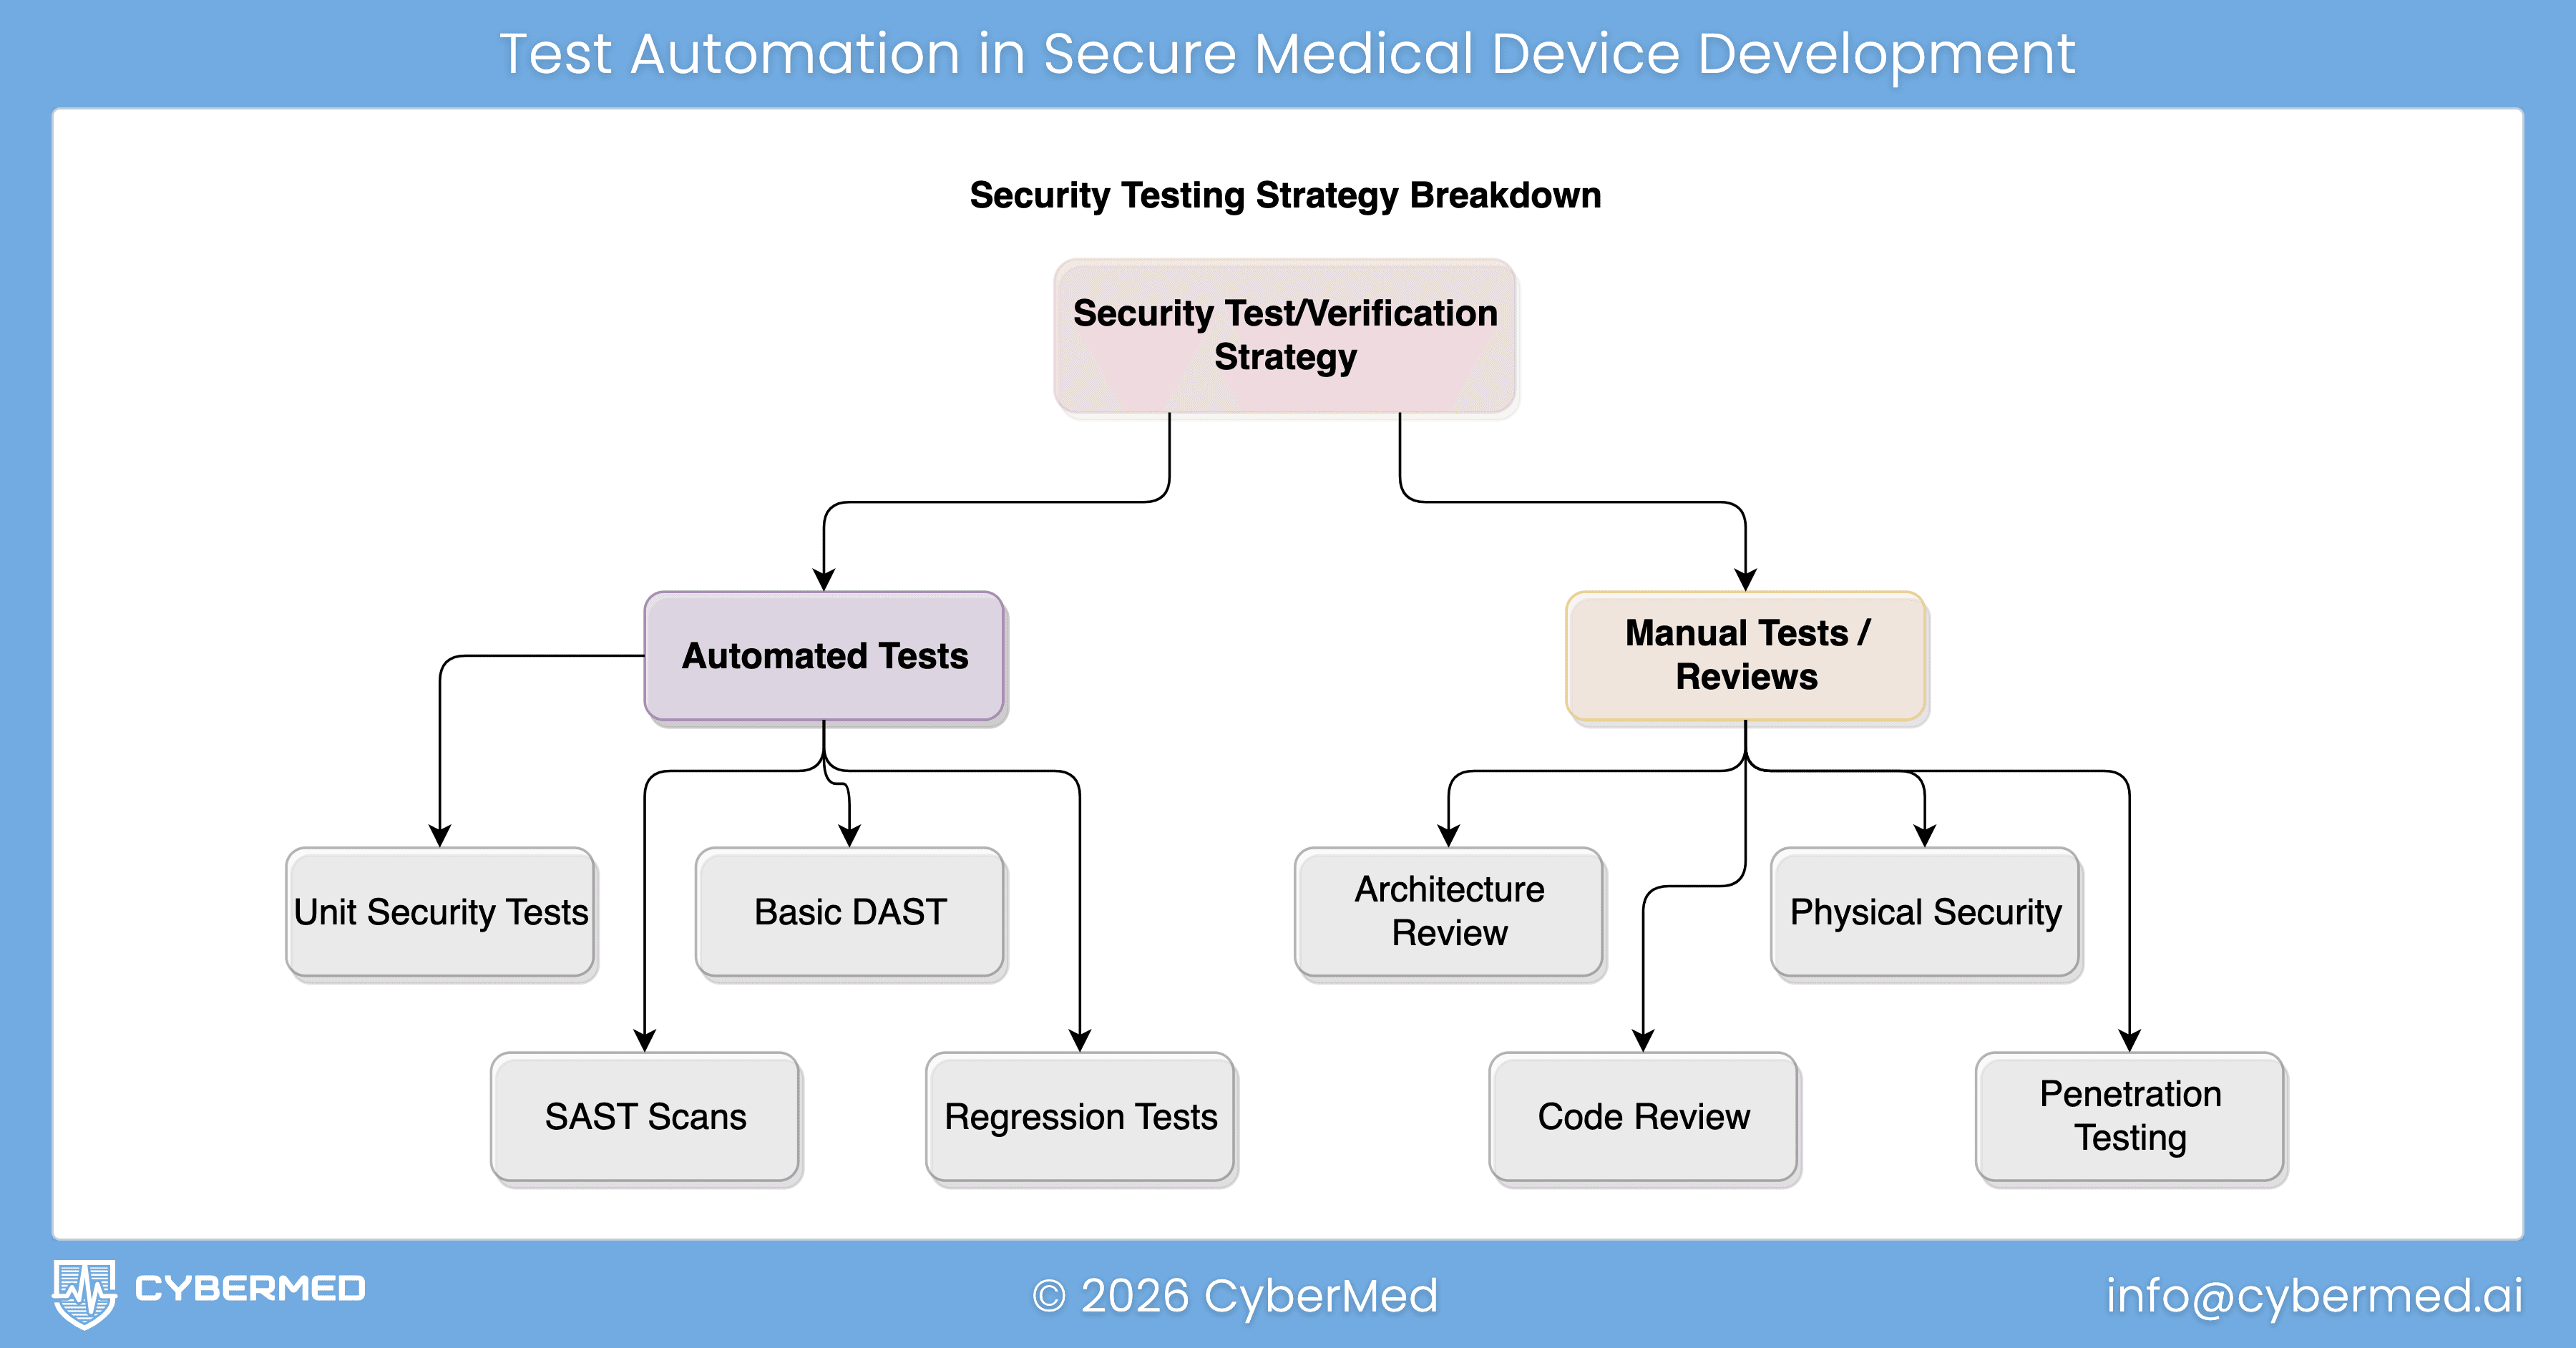
A lot of teams reduce security testing to a single deliverable: the penetration test report. That is too narrow.
The FDA's guidance expects evidence across multiple categories of testing. In plain English, reviewers want to see that:
- your security requirements were implemented correctly
- your threat mitigations actually work
- you tested for vulnerabilities and malformed inputs
- you performed penetration testing that looks like a real attack, not a paperwork exercise
SW96 reinforces the same idea from a risk-management angle. Security testing should be tied to hazards, threats, interfaces, and reasonably foreseeable misuse. In other words, testing is not there to generate screenshots. Testing is there to prove that the security controls protecting safety and effectiveness hold up under realistic conditions.
That is also how we frame it in our guide chapter on security testing approaches. Start with broad, repeatable checks early. Add deeper reviews as the design stabilizes. Save the most expensive manual attack work for the point where the architecture, interfaces, and workflows are mature enough to test seriously.
The testing stack every device team should plan for
Here is the practical stack I would recommend for most connected devices, SaMD products, and software-heavy systems.
1. Security architecture review
This is the earliest review, and one of the most valuable.
Before you run scanners or hire a penetration tester, review the security architecture itself. Look at trust boundaries, external interfaces, privileged workflows, update paths, cloud dependencies, mobile-app connections, and any path that could affect therapy, diagnosis, data confidentiality, or system availability.
How to perform it:
- gather your system architecture, interface inventory, and data flows
- identify every entry point: network ports, APIs, radios, USB, service tools, update channels, cloud endpoints, and admin functions
- review where authentication, authorization, encryption, logging, and fail-safe behavior actually live
- challenge assumptions like "this network is trusted" or "that service is internal only"
What good output looks like:
- an attack surface inventory
- a list of trust boundaries
- a short set of design gaps to close before deeper testing
- updated security views that can support later submission evidence
If the architecture is weak, later testing will mostly tell you what you should have designed differently in the first place. That is why architecture work comes first. For teams still building this foundation, our posts on FDA cybersecurity requirements for medical devices and security architecture for medical devices are the right starting points.
2. Threat model review
The threat model tells you what to test on purpose.
Without it, teams tend to test what their tools make easy rather than what their risk profile makes important. A good threat model review forces the team to ask: who could attack this device, through which interface, with what consequence, and which controls are supposed to stop them?
How to perform it:
- map assets, data flows, and trust boundaries
- identify abuse cases for every external and privileged interface
- include threats to confidentiality, integrity, availability, and safety
- review what happens if one control fails and an attacker chains weaknesses together
- update the model after major design changes, new integrations, and significant bug fixes
What good output looks like:
- a prioritized list of attack scenarios
- clear links between threats, controls, and test cases
- clear rationale for why some scenarios deserve deeper testing than others
This is where methods like STRIDE become useful, especially when paired with a practical threat modeling process for cloud-connected medical devices.
3. Security requirements verification
Once you have security requirements, you need to prove they were built correctly.
This is the part many teams under-document. They know they implemented authentication, encryption, logging, or update signing. What they do not always show is the evidence that each security requirement was verified under normal, boundary, and misuse conditions.
How to perform it:
- turn each important security control into a testable requirement
- define expected behavior for valid use, invalid use, and edge cases
- test boundary conditions, timeouts, lockouts, key handling, permission changes, and failure modes
- map results back to the requirement IDs and risk controls
What good output looks like:
- pass/fail evidence for each requirement
- test cases tied to design inputs and risk controls
- boundary analysis for security-sensitive behaviors
- clean traceability into your FDA cybersecurity traceability matrix
This is where reviewers start to see that your program is disciplined rather than improvised.
4. Secure code review, supported by SAST
Code review and static analysis answer a different question than penetration testing. They ask whether the implementation itself contains avoidable weaknesses.
This matters because many device issues are cheaper to fix at code-review time than after integration testing. Hardcoded secrets, broken access checks, unsafe parsing, weak cryptography use, improper logging, and insecure update logic are all easier to catch before they are wrapped in a larger system.
How to perform it:
- run SAST routinely in CI, not once before submission
- tune rules to your languages, frameworks, and threat profile
- review high-risk code paths manually: authentication, authorization, crypto, update handling, parsers, IPC, and network services
- treat scanner output as triage input, not final truth
- require developers to show the fix and the reason the fix is sufficient
What good output looks like:
- a reviewed backlog of findings with severity and disposition
- evidence of manual review for high-risk modules
- repeatable scanning in the build pipeline
- fewer late-stage surprises during system testing
If your team wants a separate deep dive, we already have a post on security code review for medical device software.
5. Vulnerability scanning and component review
This is where teams check for known weaknesses in the software and infrastructure they depend on.
For medical devices, that usually means more than a network scan. It includes software composition analysis, SBOM review, dependency vulnerability triage, OS and container checks where relevant, and validation of third-party components that could affect security or safety.
How to perform it:
- maintain an accurate SBOM and dependency inventory
- scan third-party components and supporting infrastructure for known vulnerabilities
- review exploitability in the context of the actual device architecture
- do not stop at CVE presence, determine whether the vulnerable component is reachable and what the clinical impact would be
- feed remediations back into design controls, patch plans, and anomaly management
What good output looks like:
- a current component inventory
- risk-based triage of known vulnerabilities
- justification for remediated, mitigated, or accepted findings
- stronger evidence for SBOM generation and analysis
This category is especially important because many teams confuse "we have an SBOM" with "we understand our exposure." Those are not the same thing.
6. Fuzz testing and robustness testing
If your device accepts inputs, it should be tested with malformed, unexpected, and hostile inputs.
Fuzz testing is one of the best ways to find parser crashes, memory errors, protocol weaknesses, and unstable behavior that ordinary functional testing never hits. It is especially valuable for network protocols, file parsers, wireless interfaces, update packages, and any component that consumes structured data.
How to perform it:
- choose high-risk interfaces first: APIs, protocol parsers, file imports, update packages, BLE or Wi-Fi messages, and cloud message handlers
- define what safe failure looks like before you start: reject, log, rate-limit, isolate, recover
- run both dumb fuzzing and format-aware fuzzing where possible
- capture crashes, hangs, resource exhaustion, state corruption, and classic security exploits
- retest after remediation to confirm the fix and check for regressions
What good output looks like:
- repeatable fuzz campaigns against named interfaces
- documented malformed-input handling behavior
- crash triage and remediation evidence
- proof that the device fails safely under bad input conditions
For connected medical devices, fuzzing often exposes issues that matter to both cybersecurity and system reliability. That is exactly why it belongs in the plan, not on the wish list.
7. Penetration testing, performed by an independent party
Penetration testing is where you ask a skilled team to behave like an attacker and try to chain real weaknesses into meaningful impact.
For FDA-facing work, the key point is independence. The guidance expects manufacturers to document who performed the penetration testing and the degree of independence from the developers responsible for the device. In practice, if you want a submission-grade result, use an independent testing party. For most companies, that means a third-party team with medical device context.
How to perform it:
- schedule penetration testing after the architecture, major interfaces, and security controls are stable enough to test seriously
- define scope clearly: in-scope interfaces, user roles, environments, safety constraints, and prohibited destructive actions
- provide enough documentation for efficient testing, but not so much that the exercise becomes unrealistic
- combine external attack paths with authenticated and privilege-escalation scenarios
- require remediation and re-test time before submission deadlines
What good output looks like:
- tester identity and independence clearly documented
- scope, methodology, and limitations stated plainly
- real findings, not only scanner exports
- impact analysis in device context, including safety implications where relevant
- remediation verification and residual-risk rationale
This is the test executives usually ask about first. It matters. But it works best when architecture review, threat modeling, code review, scanning, and fuzzing have already done their job. A penetration tester should be validating and sharpening the program, not discovering basic hygiene problems for the first time.
If your current plan is "we will do the pen test right before we file," the safer answer is to move it earlier.
How to sequence these activities in the real world
A practical sequence looks like this:
- Early design: architecture review and threat model review
- Implementation: secure code review, SAST, and component scanning
- Integration: requirements verification, interface abuse testing, fuzzing, and robustness work
- Pre-submission: independent penetration testing, remediation, re-test, and report packaging
- Post-market: recurring scanning, vulnerability triage, targeted re-testing after major changes, and updates to risk documentation
That sequence lines up well with the broader lifecycle described in our book and with the FDA's expectation that security remains active across development, submission, and post-market work.
What FDA-ready evidence should look like
By the time you are preparing submission documentation, you should be able to answer five simple questions clearly:
- What did we test?
- Why did we test those areas?
- Who performed the testing?
- What did we find?
- How do we know the fixes worked?
If your team cannot answer those questions with traceable evidence, the problem is usually not the final report. The problem is that the testing program was not structured early enough.
That is where companies lose time. They scramble to reconstruct rationale, map findings back to risks, explain tester independence, and fill documentation gaps after the testing is already over.
A stronger approach is to build the evidence path while you are building the product. Our guide section on security testing documentation for eSTAR submissions shows what that evidence package should contain.
The practical takeaway
The best medical device security testing programs do not treat testing as a compliance afterthought. They treat it as evidence that the device is ready for scrutiny from engineering, quality, regulatory, hospital IT, and FDA reviewers.
If you want a simple rule, use this one: review early, automate broadly, test deeply where risk is highest, and keep penetration testing independent.
That is the model in our book. It aligns with FDA's guidance. It fits SW96's risk-based logic. And it gives your team a much better chance of walking into submission with evidence that holds up.
If you need help building the testing plan, running the independent assessment, or packaging the results into submission-ready documentation, CyberMed can help. Start with CyberSprint or contact us if you want to turn this into a real testing program rather than another late-stage scramble.